
Surfacing to share a lesson from the art classes for children I'm currently teaching!
I've been having such a fun time letting the littles explore texture, colour, and different mediums. They are open to new ideas almost immediately and quickly learn to manipulate the techniques they've learned to suit their personal style.
Recently, I made these lovely multi-media pieces with my 5 - 9 year old class. We called the works "The Midnight Pond". Here's how we made them!

...make one of each, a green-ish one and a brown-ish one...

Let those guys dry.
Meanwhile, with a pencil draw a hatch pattern on some white cardstock (I cut them to a 8.5 x 5.5' size...more manageable for this age group with the colouring we are about to do).
Then let the children pick a selection of blue shades from piles of crayons, pastels, pencil crayons, markers, you could even let them paint one or two of the squares! The idea here is to have them explore the various mediums within a structured pattern.
The end effect is just the right balance between order and disorder for visual interest.
I outlined the one square that is going to represent the moon in yellow, to avoid the "I forgot to leave a square for the moon!" cry that is bound to happen with some students.


I thought these nature-inspired pieced turned out quite well! They reminded me a bit of the Lily Pad art I did a few years back. It's fun to switch up the techniques to keep the kids learning and on their toes!
Thanks for stopping by...
I've been having such a fun time letting the littles explore texture, colour, and different mediums. They are open to new ideas almost immediately and quickly learn to manipulate the techniques they've learned to suit their personal style.
Recently, I made these lovely multi-media pieces with my 5 - 9 year old class. We called the works "The Midnight Pond". Here's how we made them!
 |
| 'The Midnight Pond' |
First, we made our own patterned paper by using a variety of shades in the same colour family (watercolours work well) on plain old computer paper. (Sounds crazy, but the texture of hand painted computer paper is perfect for what we are doing here.)

...make one of each, a green-ish one and a brown-ish one...

Let those guys dry.
Meanwhile, with a pencil draw a hatch pattern on some white cardstock (I cut them to a 8.5 x 5.5' size...more manageable for this age group with the colouring we are about to do).
Then let the children pick a selection of blue shades from piles of crayons, pastels, pencil crayons, markers, you could even let them paint one or two of the squares! The idea here is to have them explore the various mediums within a structured pattern.
The end effect is just the right balance between order and disorder for visual interest.
I outlined the one square that is going to represent the moon in yellow, to avoid the "I forgot to leave a square for the moon!" cry that is bound to happen with some students.

Once all the squares have been coloured in, your painted papers should be nice and dry.
(Crispy, right? Perfect for folding and manipulating? See, I wasn't crazy to use computer paper!)
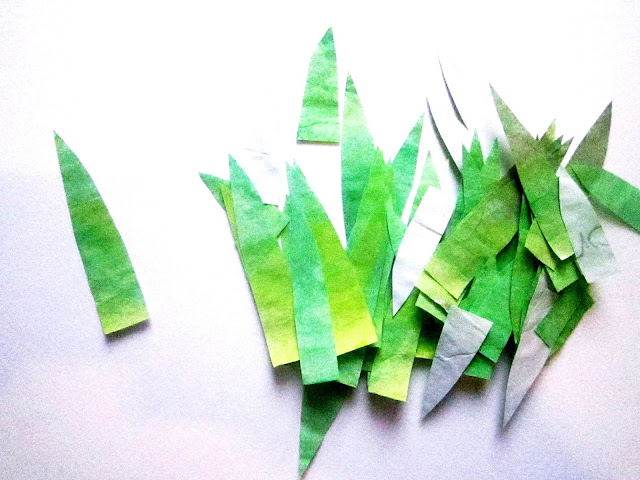
Let the students cut some tall, some short "reeds" for their pond out of the green paper.
Also, cut one large typha plant (commonly known as cattails) out of the brown.

I had the students fold their reeds in half to add some texture and I handled the glue gun to affix them to the pond.
They told me where they wanted them, most finding the framing option (both on the right and left margins) most pleasing. (Before I glued anything down, I added a black stem for the cattail with a black sharpie.)

I put the glue onto one side of the folded leaf, only at the bottom so that there was plenty of surface area to 'pop' off the page, giving visual interest and texture.

I thought these nature-inspired pieced turned out quite well! They reminded me a bit of the Lily Pad art I did a few years back. It's fun to switch up the techniques to keep the kids learning and on their toes!
Thanks for stopping by...
Brilliant! Lovely texture, color and patterns :) I bet the kids have so much fun in your class!
ReplyDeleteArt was always my favorite class as a kid! You do so many fun projects with them. Love the layers in these pieces :)
ReplyDeleteHow cool and so much fun! It turned out lovely!
ReplyDeleteLovely!
ReplyDeleteThanks Duni, Edi, AB, and Chelsey! We had lots of fun making these :)
DeleteThis activity sounds lovely! I like all the colors you use! :)
ReplyDeleteHow cool!
ReplyDeletewonderful tutorial thanks for sharing
ReplyDeleteThanks for stopping by, Carolina, Melissa + JJ!
Deletenice.. the kids must have loved it.
ReplyDeleteHena, they did! They especially loved seeing their painted paper come to life, cut into shapes and pasted into the scene. I love what I do!
Delete